 | |
|
We began with a builder-basic bath that was almost 20 years old and complete with peachy fixtures, bright blue paint, vinyl flooring, mis-matched light bulbs, and a super short vanity. They goal? A "John Wick"-worthy space that could be done quickly (while our daughter was away in France) and preferably for a reasonable cost. The plan was for Jody and Trent to do most of the work, with Frank helping out on the weekends and after work as needed. It ended up taking just under four weeks, but given that Frank was away for the first weekend and we headed to a NASCAR race and had a full soccer schedule in there, I think we did okay!
 |
| The original bathroom. |
The design was a mix of stuff we chose (Trent chose the mosaic that is featured and drove pretty much every other design choice, and the kids picked out all the faucets), stuff we had (the vanity), and stuff we scored crazy deals on (paint and vanity top). And everything else just sort of fell into place.
 |
| THE tile that drove the design, along with the flooring and vanity paint chip. |
Summary of changes:
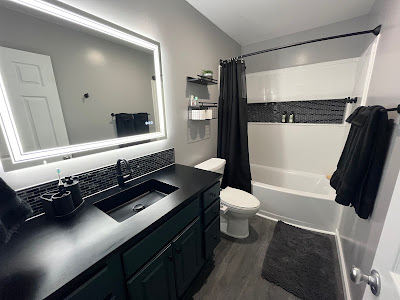
- The bath. We tore out the old one and chose to go with a tub/wall system. While we prefer full tile, it's been over a decade since I last tiled and really just wanted to keep this project moving along. Therefore we chose the Bootz Nextile 4-piece wall system (available at Home Depot) so that we could at least add a little pop of tile. This required us to pick a tub with an edge that would work with the wall system and as we weren't fans of the shallow tubs they market with it, we opted for an American Standard tub that curves out a bit. The Nextile back wall actually comes into the shower space about 4" to create the niche (rather than having it set back in the studs) so the curved tub helps to regain that space so the shower feels spacious. Paired with a curved shower rod it's just perfect! But...this choice led to some issues. The subfloor was in good condition, but there was luan under the vinyl flooring and not under the old tub, and since the new tub curved out over where the old vinyl floor was, we had to pour some self-leveling concrete to match everything up. We also had to cut the subfloor to drop the old drain about 2" to accommodate the modern tub. And totally not related to our tub choice, we had to fix the framing around the tub--we had always noticed a curve in the wall and discovered that 1x4 "shims" had been used on one wall and we honestly think it was done because the ceiling drywall was cut short and they had to fill the gap somehow! Gah! I removed all of that unnecessary wood, we shimmed the sides equally where needed, and I fixed the drywall. While we were in there we also ran the water lines correctly through the studs rather than outside of them like we found them. And just for fun, I added rockwool to all of the shower walls to help keep shower sounds out of the adjacent bedrooms.
 |
| A quick before/during/after. |
 |
| The plumbing issue (top left), the "interesting" shims (bottom left), and the view of the drainpipe from inside the crawl space--just had to adjust this a little! |
 |
| The build! |
- The tile. The Nextile walls gave us the opportunity to add an accent to the shower and we opted to use that same tile as the backsplash for the vanity. I love how it ties the room together! This was a bit of a splurge, but as we didn't need too much of it we went for it. The tile really set the mood for the other design choices. We also finished out the tub with a border of subway bullnose tiles. For the grout, I chose the grey color from a selection of $3 "open bags"--we didn't need much and that stuff is normally $19.50 a bag! We also had to get some white grout for the tiles around the tub.
 |
| A splurge, but I LOVE this shiny/matte/cracked glass mosaic! |
- The vanity. The old vanity cabinet was only 30" tall and basically hit Trent mid-thigh, but it had lots of drawers that the kids liked. And since I don't like trashing stuff if we don't have to...we made it better! The vanity was "lifted" 4.5" on a wood base and we cut a new side panel and toe kick for it. We had scrap material from another project and only had to purchase two 2x4's to make this work. It was all painted with an oil-enhanced latex furniture paint in a gorgeous dark green and given new, matte black hardware. I am very happy with how modern this old vanity looks now and super happy that Trent can brush his teeth without doing a deep squat!
 |
| This little project brings me so much joy! So happy we could make the old vanity work! |
- The vanity top. This is noteworthy for just how crazy this item is! We had purchased the basic $200 white vanity top at Lowe's when I saw a FB Marketplace listing for a 48" black vanity top that looked sharp. But there was a catch--it was only 48" (normally you have a 49" top on a 48" cabinet). I chatted with the seller who had installed one (he had a spare!) and his contractor had shimmed the top a bit to make it hang over a little on the right edge. We looked at our tile mosaic and realized we could use the tiles from it to make a little shim, too. I went for it and ended up with a vanity top that retails at $1300 (but was on sale for $900 at the time) for $150! Cheaper than the Lowe's basic and it looks so good!
 |
| The surprise bargain of the project! |
- The floor. I didn't really need to pull the old vinyl out for the flooring we chose, but I did anyway just to get eyes on the subfloor. We went with a Pergo Wet-Protect LVP flooring. Having used a similar product in two other spaces, I was excited to avoid the 2-day tile/grout process and looking forward to the feel of this floor. The curved tub added a bit of a challenge to the install, but nothing Frank couldn't handle! While the product doesn't require an underlayment, I still had some from those other projects so we used it here, too, just for some extra cushion and sound abatement. Am I worried about the edge that meets the tub? No. We don't have little kids that make big bath messes and we have a nice, flexible trim to help keep water off the edge of the LVP.
 |
| Frank did a beautiful install one afternoon while I was out of town! |
- The mirror. I had a plan! I was going to cut down the old builder-grade mirror and frame it in the same color as the vanity. Well, my second cut sent a huge crack through the mirror so I had to scrap that plan and start shopping, soooo....
- The lighting. With the mirror "fail" my shopping took me to a few modern, LED lit mirrors. Oh. My. We had a stayed at some AirBnB's with these mirrors and I liked them. When I priced it and compared to getting a new mirror and a new light fixture, the mirror/light combo was honestly not too much more. Installing it the way we wanted to required us to remove the old light box and wire a receptacle behind the new mirror. It was very easy as the old light had plenty of extra wire to it so I just added the new receptacle box about 10" lower on the wall. LOVE IT. This mirror has a defogger and three different light warmth settings which can also be dimmed. We also trashed the old, loud exhaust fan and replaced it with a low-profile Braun fan with an LED light. As both LED lights have selectable warmth settings, we are able to "match" the light tones in the room to make it a cohesive look.
 |
| I've never been so happy that I cracked a mirror! This one is sweet! |
- The commode. The toilet was upgraded to an American Standard "Champion" and we added a Tushy bidet (seriously, I WILL find a way to get a bidet on the boat!). And of course we swapped out the flusher so it matched the fixtures. This toilet may seem pricey when you first see the cost, but it comes with the wax ring you need to install it and a soft-close lid (another thing I think is a "must").

- The fixtures. All the plumbing and hanging fixtures were changed to matte black. Most are Allen+Roth items from Lowe's, but a few are Amazon finds. I also updated the receptacle and switches to decora-style (expect to see more of that throughout the house!).

- The paint. Of course we were going to paint, but this was another "find!" We make a habit of passing by the "oops" paint rack at Lowe's anytime we are in there. This is a great way to get 50% or more off of paint if you're doing a small project that only requires a gallon. While we were picking up the tub there was a grey color that looked like it might work and at $20, we figured we could try it. Well, we're all happy with it and very happy to not have paid $50 for it!
Cost (approximate; note that we get a 10% military discount on most items at Lowe's and Home Depot and that's reflected here):
Tub $300
Shower walls $460
Rockwool $70
Mosaic tile $180
Trim tile $30
Tile supplies (mastic, grout, caulk) $95
Floor leveling supplies $60
Drywall supplies $75
Lumber (framing, shims, trim) $50 (and also used some scraps we had)
Vanity paint $30
Vanity top $150
Flooring $135
Mirror $240
Exhaust fan $150
Toilet $229
Bidet $76
Wall paint $20
Ceiling paint $0 (had on-hand from another room)
Cabinet hardware $14
Tub and sink faucets $240
Towel bars/hooks $90
Shelves $20
Plumbing supplies $200
Electrical supplies $20
TOTAL $2934
It's probably fair to say I missed a few things so let's call it $3000. We have quite a few tools on hand that will be used throughout the house so the cost of those isn't included, but that's a big part of any renovation project as well. We were also fortunate to have neighbors who let us borrow the perfect hole saw to make our cut for the tub faucet! We could have made this project more affordable as cheaper options were available for the tub, toilet, flooring, fan, mirror, faucets, fixtures, and backsplash (and I guess some would say a bidet isn't a necessity, but IMO it is!), so this could easily have cost $600-$800 or maybe even $1000 less. But this isn't a flip, it's our home. And I'm ok admitting that some of our choices were made simply because we wanted to make them! And because seriously folks, a bidet IS a necessity.
~Jo, Country Domestic Engineer
No comments:
Post a Comment